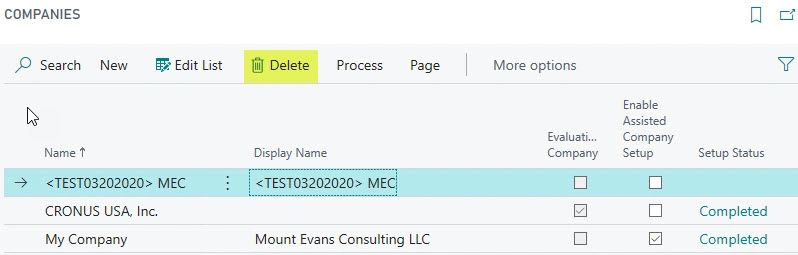
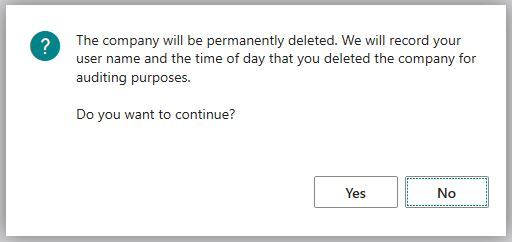
Deleting companies within Business Central is no longer a scary task. With the 2020 release wave 1 version 16.0 of Business Central, Microsoft made deleting a company even harder than it was before. Prior to version 16.0 when you deleted a company you were only asked once if you wanted to delete the company and once you said yes there was no going back. Now you have three prompts that you need to click yes on to delete the company. I'm sure Microsoft had many requests on how to restore an accidently deleted company which prompted for this change. If you do by chance delete a company on accident then Microsoft can restore using a point in time restore. So typically you find out when the company was deleted and they can restore up to 5 minutes before it was deleted, for example.
Applying posted credit memos to posted invoices isn't a hard task to complete in Microsoft Dynamics 365 Business Central. The example I use below is for a vendor credit, but the same process applies to customers. Version: US Business Central 20.0 Open up the vendors list. Search for vendor that you'd like to apply the credit memo to an invoice for. Click on Balance field to open up Vendor Ledger Entries window. This will show all the 'open' documents on the vendor ledger. Select the line for the Credit Memo that you want to apply to a posted invoice. Click Process > Apply Entries Within the Edit - Apply Vendor Entries window select the line(s) that you'd like the credit memo applied to. Click Process > Set Applies-to ID This will put the users name into the Applies-to ID field on the line selected. To post the application select Process > Post Application. Written by: Kristen Hosman, Microsoft MVP
I had a client ask me if the Aged Accounts Receivable report could be modified a bit since he was having to modify it manually and it was taking him around 6 minutes each time. As I started discovery on what he wanted I asked him what his requirements were. Aged by = Document Date Length of Aging Periods = 45D Print Detail = Yes Print to Excel = Yes Include a Pivot Table with the following information: Customer name Total balance due Total over 45D due Top 3 customers Percentage of 45D due vs total balance due To get started I asked him to send me a screen shot of the Aged Accounts Receivable options window to verify how he is running the report. I also asked him to send me a copy of the Excel file with his changes in it for me to review. Next Steps Next step was for me to figure out if I was going to have a developer create a custom report or if I was brave enough to try something I've never done before. I went the brave route and started searching through Microsoft Docs fo...
Steps to reverse a bank account transaction or customer payment in this case. Have you ever entered a customer payment and needed to void it out of the system? If so, this blog is for you! Follow the steps below to learn how to unapply a payment and void/reverse the payment. These steps will void the payment and the invoice will remaining outstanding when completed. Open the Bank Account Ledger Entries window and select the line for the transaction in question. ctrl+alt+Q on keyboard to open the Find entries page, or click on find entries on the Action Bar. Click on the Detailed Cust. Ledg. Entry line Select a line that has 'Application' as the Entry Type and then Unapply Entries on the Action Bar Click Unapply Yes OK Close windows until you get back to the Bank Account Ledger Entries page. Select transaction and then Reverse Transaction from the Action Bar. Reverse Yes OK Written by: Kristen Hosman, Microsoft MVP


Comments