Posts

Showing posts with the label General Journal

Reverse Register: reverse a posted G/L batch in Business Central

Image
Sometimes you need to undo an entire posted journal. Whether it was posted in error, or the wrong dimensions or dates were used you can reverse all the entries in a G/L Register at once.  Key Points Only registers created from posting journals can be reversed this way. You cannon reverse registers that result from other modules like sales or purchasing. If the register includes entries linked to other documents or modules, you may need to handle those separately.  The reversal will automatically balance all entries. Reversals post on the original posting date of the entries. How to Reverse a G/L Register Go to the G/L Resters page. Find the register and click to select the line. Choose Reverse > Reverse Register from the action bar. Confirm that the reverse was completed by looking at the General Ledger Entries page. You will also see a new line in the G/L Registers page that shows the Source Code as REVERSAL. ------ Kristen Hosman is a Microsoft MVP in Denver. She works wi...

Account Card: Reconciliation Account Dynamics 365 Business Central

Image
When you select an account as a Reconciliation Account on the Account Card it allows you to “preview” the account balance before you post the entry you are previewing. For example, in the General Journal you can select Home > Reconcile and then the Reconciliation window will open. You will see I have several accounts marked as a Reconciliation Account and that is why there are many records showing.  This is a great feature for bank account and other accounts where you want to see what the balances will be after posting.  ------ Kristen Hosman is a Microsoft MVP in Denver. She works with Dynamics 365 Business Central and related technologies. You can also connect with her through this link:  Kristen Hosman | Linktree

Reversing a posted journal entry in Dynamics 365 Business Central

Image
Reversing a posted general journal entry is possible through the general ledger entries page in Microsoft Dynamics 365 Business Central.  Considerations before reversing: Are you allowed to post on the posting date? Is this a prior year entry? Have you already filed taxes for the year the entry will be reversed? Navigate to the General Ledger Entries page and search for the transaction you'd like to reverse Select the transaction you'd like to reverse Click on Home > Reverse Transaction Review and then click on Reverse ------ Kristen Hosman is a Microsoft MVP in Denver. She works with Dynamics 365 Business Central and related technologies. You can also connect with her through this link:  Kristen Hosman | Linktree

Working with Posting Dates in Microsoft Dynamics 365 Business Central

Image
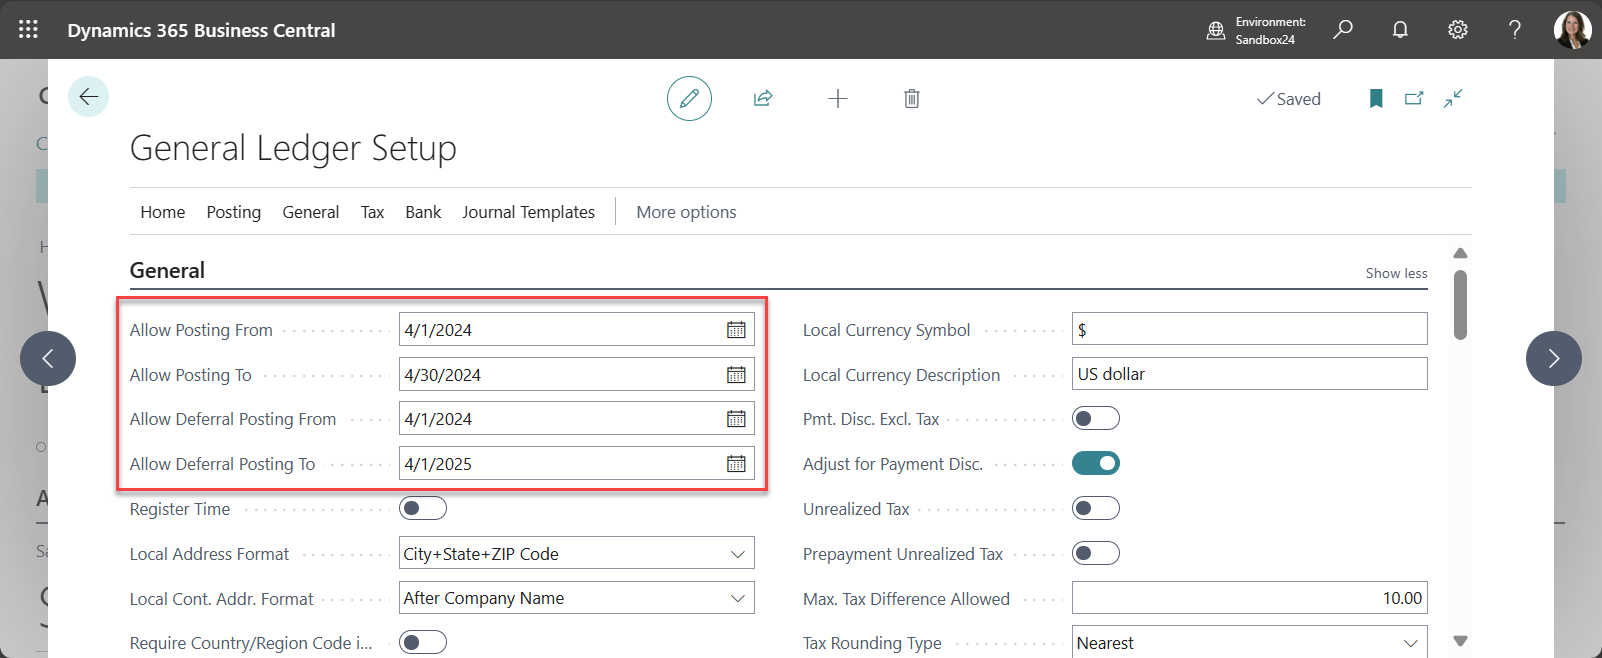
It's standard practice in accounting to "lock" down closed or future periods to prevent users from posting. Within Dynamics 365 Business Central you have what I call a company setting and a user setting. The company setting affects all users within the company, I refer to this as the "rule" and the user setup allows you to make an exception to the rule.  General Ledger Setup Within the General Ledger Setup window, you have the Allow Posting From and Allow Posting To fields. I often recommend to users that you want to populate these fields with the current account period to restrict users from posting in the wrong period. You also have the option to set dates for the Deferral Postings as well. Keep in mind that the deferral dates may be different than the standard posting dates because you're more than likely posting into the future for the deferrals.  The General Ledger Setup is what I refer to as the "rule." User Setup If you need an exception to ...

Using Standard Journals in Business Central

Image
There is a concept in Dynamics 365 Business Central called Standard Journals, which allow you to set up predefined entries (templates) that you can use over and over again. Think of those entries that happen on a recurring basis.  Here are some examples: Payroll Bank Transactions Reclasses Depreciation (if you're doing it manually) Allocations Month-end adjustments Here are some benefits of using Standard Journals:  Can choose to save amounts Company specific so any user can utilize them Setting up Standard Journals Open General Journal and select the batch you'd like to work in. In my example I'm going to select the PAYROLL batch. Since payroll is bi-weekly for me, it makes sense to make this a Standard Journal. This will allow me to save the payroll entry with or without the amount so when the time comes for payroll it's quicker for me to enter the entry. Once the entry is ready to be saved as a Standard Journal follow these steps. Actions > Functions > Save as ...

Dynamics 365 Business Central - Is this a feature or a bug? Filtering and posting General Journal lines

Image
This blog is inspired by something I just learned from James Bowles .  Scenario: I have a General Journal with multiple lines and only want to post certain transactions/lines.  In my example I am going to filter on the Posting Date field so only the 04/30 transaction is posted. Once the posting is completed you will see the remaining lines in the journal.  Review the General Ledger Entries and you see only entry posted was the 04/30. Written by: Kristen Hosman, Microsoft MVP

Dimension Corrections in Microsoft Dynamics 365 Business Central

Image
If you've ever coded something to the wrong dimension and noticed after posting don't just assume a journal entry is the only way to fix it. Microsoft has included a Dimension Corrections tool within Business Central and it's pretty easy to use. Let's walk through the process of updating a posted entries dimension where the user forgot to add the dimensions in this case. Same process would apply if you needed to change a posted dimension as well. Within the General Ledger Entries page, select the line for the entry that needs to be corrected, then click on Entry > Correct Dimensions.  Within the Draft Dimension Correction window go ahead and update the description if needed and mark Update Analyses Views if you're using those.  Next section Dimension Correction Changes go ahead and add the updates. In my case my entry is missing two dimensions so I'm going to add each of those in there. Since my dimensions were missing the Dimension Value Code field is blank,...

Sorting, Searching, and Filtering in Microsoft Dynamics 365 Business Central

Image
I get the question a lot from my clients moving from Microsoft Dynamics GP to Microsoft Dynamics 365 Business Central if SmartList exists. For those of you who are not familiar with SmartList it is a tool that allows users to sort, search, and filter data within the system for reporting purposes. While "SmartList" as we know it doesn't exist, Business Central does have very similar qualities within the system that allows users to do the same, it just looks and feels different.    Lets take a look at how this functionality works within Microsoft Dynamics 365 Business Central. Scenario:  It's month end and you're reviewing financials and see that travel is a bit high for the month. You want to pull detailed information and see what was coded to the travel expense account. You have two options: Pull a detail trial balance - this process can be clunky as you have to add a filter for the account number and date range within the report options window. And then if you wa...

Microsoft Dynamics 365 Business Central - Dimension Correction Tool Permissions/Security

Image
2021 release wave 1, brought us the Dimension Correction tool. For the users that don't have proper security they will receive the following message when trying to use the tool.  ISSUE You do not have the following permissions on TableData Dimension Correction: Insert. To view details about your permissions, see the Effective Permissions page. To report a problem, refer to the following server sessions ID: 'XXXX'. SOLUTION To correct this issue you can setup a custom permission set and assign it to the user groups or users that need access to use the tool. Navigate to the Permission Sets window. Select +New to setup a new Permission Set. I like to name it 'DIMCORRECTION' and name it 'Dimension Correction'.   Click on Permissions once you have the Permission Set setup. Add the following Table Data Object ID's to the Permissions window.  Add the DIMCORRECTION permission set to either a User Group or directly on a User card. To add to a User Group navigate ...