Microsoft Dynamics 365 Business Central: Processing Electronic Payments
This is the second blog post of a series on configuring and processing electronic payments within Microsoft Dynamics 365 Business Central.
Blog Series Links
#1 - Configuring Microsoft Dynamics 365 Business Central: Electronic Payments
#2 - Microsoft Dynamics 365 Business Central: Processing Electronic Payments
#3 - Microsoft Dynamics 365 Business Central: Electronic Payment Issues I've Encountered
Microsoft Dynamics 365 Business Central: Processing Electronic Payments
If you haven't configured the system yet to process electronic payments review my first blog of this series here.
Payment Journal Batch Setup
When setting up the payment journal it's important to remember a few things that are required at the batch level:
- Bal. Account Type = Bank Account
- Bal. Account No. = XX
- Allow Payment Export = checked
Processing Payments in Payment Journal
- Once you've setup your batch with the vendors you'd like to pay make sure the Recipient Bank Account field is populated. If it isn't then it's then the Preferred Bank Account Code filed isn't populated on the vendor card in the Payments fast tab.
- The next step is to process the remittances. So only do this after you've verified that everything within the payment journal is correct. Select Bank > Export.
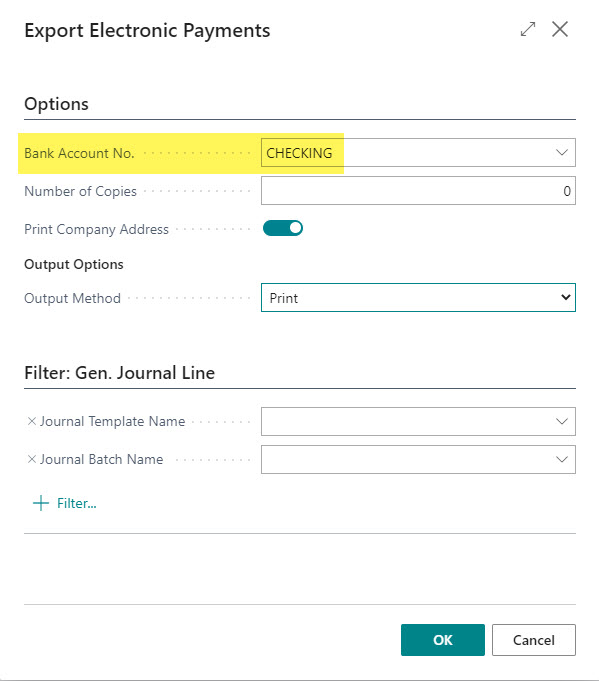
- Within the Export Electronic Payments window select the Bank Account No. and update any other options you'd like. Keep in mind that the output method determines if you print or email the remittances. This is the step that checks the box for Check Printed.
- Once remittances are printed or emailed then you can export the file to upload to your bank. Select Actions > Functions > Generate EFT File. Review and once ready to process click on Generate EFT Files.
- Text file is downloaded and ready to be uploaded to your bank.


Comments