Microsoft Dynamics 365 Business Central has Workflows built into the product that just need to be setup and enabled. Many of my clients like the ability to have sales or purchase documents auto post once approved. The steps below outline how to configure the system so a purchase invoice would be posted automatically once approved. The steps are similar for a sales document as well.
I would recommend doing this in a test company first and testing to make sure it works as desired before implementing in the production company.
Note: auto posting general ledger transactions/batches currently isn't available in BC version 15, no idea if this will be available in a later version either.
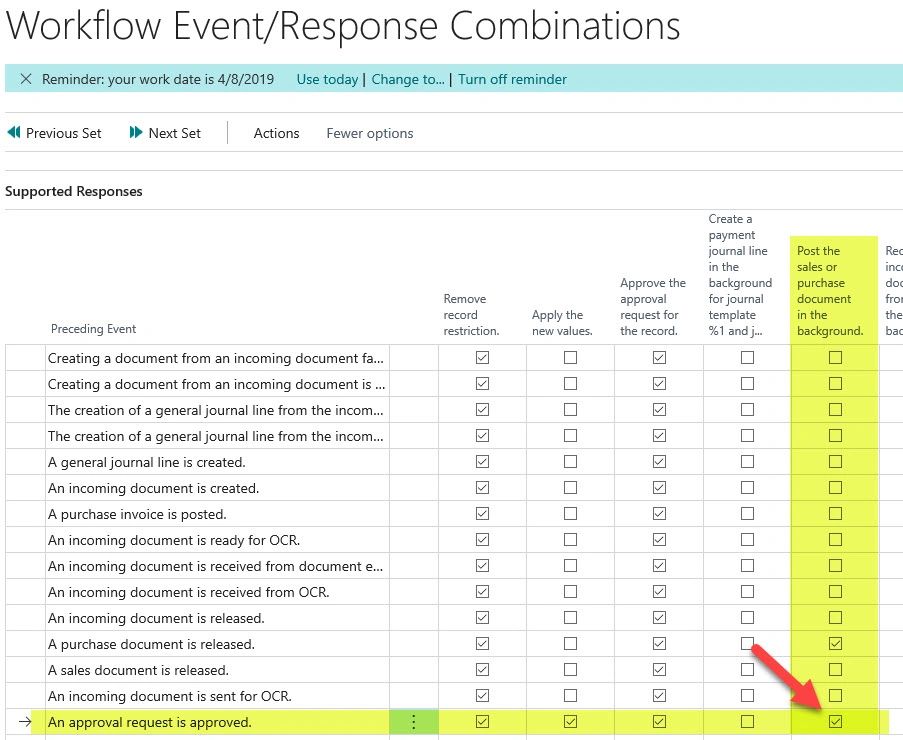
Workflow Event/Response Combinations
Step 1: open up the Workflow Event/Response Combinations window and find the row for the 'An approval request is approved' and check the box to enable the 'Post the sales or purchase document in the background.'
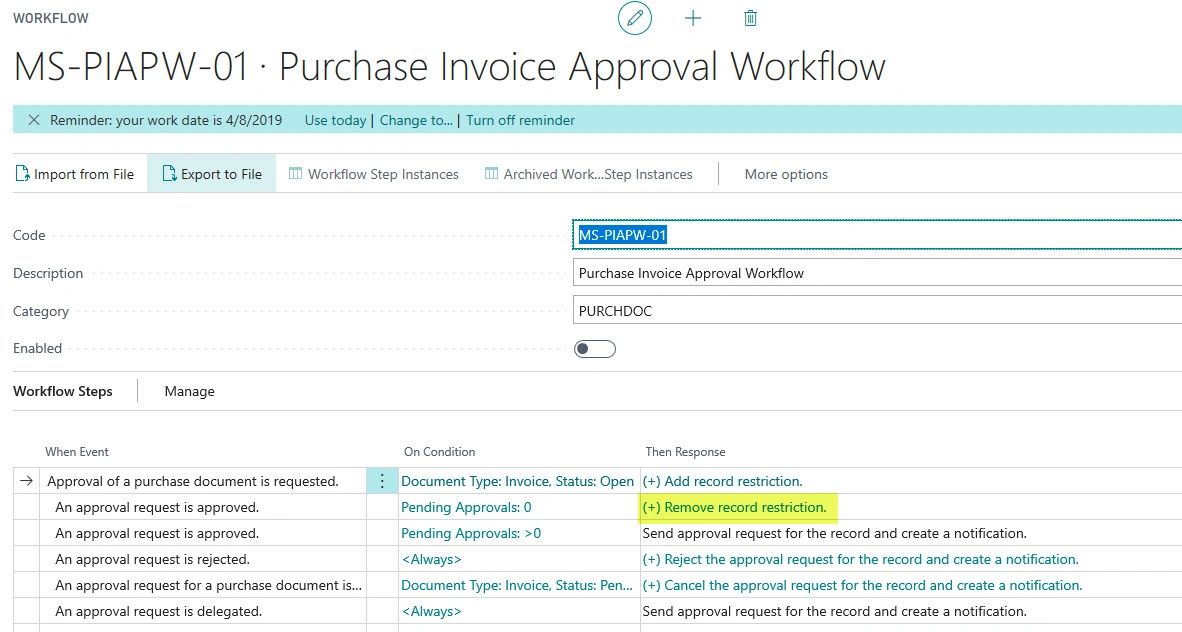
Workflow
Step 2: next open up the workflow for the Purchase Invoice Approval Workflow. Disable the workflow so you can edit it. Click on the '(+) Remove record restriction' text on the 'An approval request is approved' line.
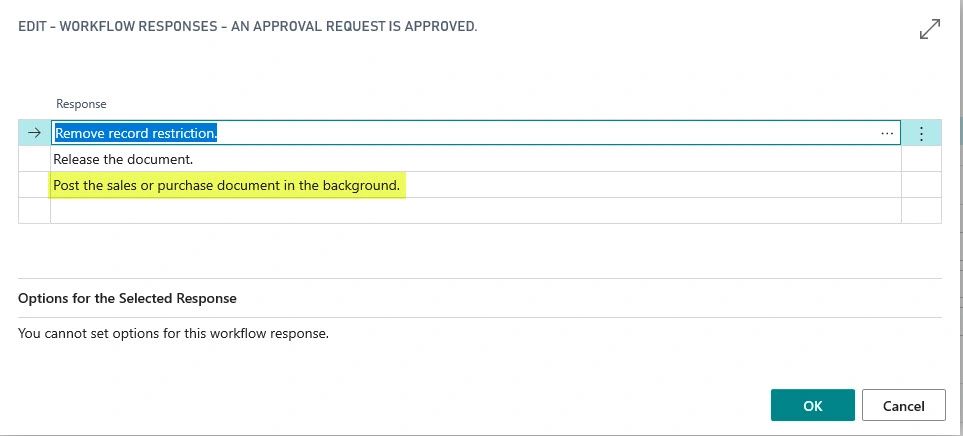
Workflow Responses - An Approval Request Is Approved
Step 3: add the 'Post the sales or purchase document in the background'
Hi, I have a scenario for dynamic 365 business central.
Scenario: I want to make an approval workflow for due payments. Example: I have create an invoice with the posting date of 01/01/2022 and due date of (according to payment terms) 1/27/2022. Now i want to create a workflow for due date as befor invoice is due system will give me a notification or send me email with the subject of due payments.
If the invoice is already posted then I would use Power Automate to send out the reminder as Business Central workflows can't do this. You could also use Power BI to make a dashboard to review.
HI Kristen, we are having the same problem, we did all the step but still the approved purchase invoice is not being posted after sending it for approval. Could you help give us some recomendation? Thank you
Anonymous said…
Hello Kristen,
Please note that I followed the same steps but my Purchase Invoice is not posted, actually when I approve it says its still "Pending Approval"
Applying posted credit memos to posted invoices isn't a hard task to complete in Microsoft Dynamics 365 Business Central. The example I use below is for a vendor credit, but the same process applies to customers. Version: US Business Central 20.0 Open up the vendors list. Search for vendor that you'd like to apply the credit memo to an invoice for. Click on Balance field to open up Vendor Ledger Entries window. This will show all the 'open' documents on the vendor ledger. Select the line for the Credit Memo that you want to apply to a posted invoice. Click Process > Apply Entries Within the Edit - Apply Vendor Entries window select the line(s) that you'd like the credit memo applied to. Click Process > Set Applies-to ID This will put the users name into the Applies-to ID field on the line selected. To post the application select Process > Post Application. Written by: Kristen Hosman, Microsoft MVP
Steps to reverse a bank account transaction or customer payment in this case. Have you ever entered a customer payment and needed to void it out of the system? If so, this blog is for you! Follow the steps below to learn how to unapply a payment and void/reverse the payment. These steps will void the payment and the invoice will remaining outstanding when completed. Open the Bank Account Ledger Entries window and select the line for the transaction in question. ctrl+alt+Q on keyboard to open the Find entries page, or click on find entries on the Action Bar. Click on the Detailed Cust. Ledg. Entry line Select a line that has 'Application' as the Entry Type and then Unapply Entries on the Action Bar Click Unapply Yes OK Close windows until you get back to the Bank Account Ledger Entries page. Select transaction and then Reverse Transaction from the Action Bar. Reverse Yes OK Written by: Kristen Hosman, Microsoft MVP
Three-Way matching is an Accounts Payable process that is used to verify a vendors invoice by checking it against its corresponding purchase order and receipt. Three-Way Matching Concept Purchase order - authorizes a purchase. Typically an itemized list of types, quantities, and prices of an order as agreed to by the buyer and supplier. The PO has a unique number to associate this order and should be used by the supplier for tracking and invoicing purposes. Delivery receipt - confirms that the items on the purchase order were delivered. Typically completed by someone in the warehouse. Vendor invoice - lists how much the buyer owes the supplier. Should match the agreed upon purchase order and items received. Three-Way Matching Process Typically this process is handled by an Accounts Payable (AP) user. Vendor invoice is sent to AP and that person verifies the delivery receipt in the system prior to entering the invoice. I will go through the basics of this process. Purchase order is issu...


Comments
I have a scenario for dynamic 365 business central.
Scenario:
I want to make an approval workflow for due payments.
Example:
I have create an invoice with the posting date of 01/01/2022 and due date of (according to payment terms) 1/27/2022.
Now i want to create a workflow for due date as befor invoice is due system will give me a notification or send me email with the subject of due payments.
If you see this comment reach out to me directly on LinkedIn and lets connect to review your issue.
Kristen
Please note that I followed the same steps but my Purchase Invoice is not posted, actually when I approve it says its still "Pending Approval"