How I use the new GL Account Review functionality in Dynamics 365 Business Central
The purpose of this blog is to discuss how I use the Review Entries feature in Microsoft Dynamics 365 Business Central to reconcile my business credit card. This feature is great for reconciling balance sheet accounts because you can match debits and credits together to track what the remaining account balance is made up of.
Process and Setup
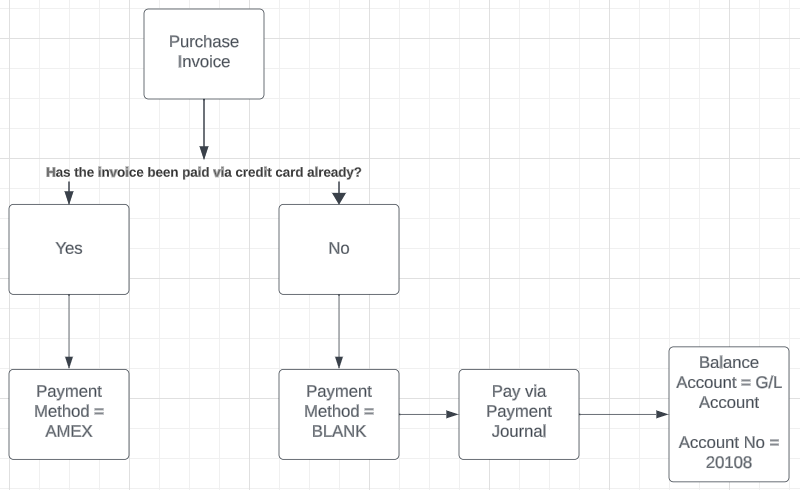
As vendor invoices are received and entered into Business Central, I follow the workflow below. I will go through two scenarios in this blog.
- Invoice is received and already paid via credit card.
- Invoice is received and will be paid via credit card at a later date.
Let's take a moment to review my setup in the system. In order for this to work as expected I set up a payment method named AMEX and add a balance G/L account of 20108.
Account 20108 is my liability account for AMEX Payable.
Examples of entering vendor invoices
Now that setup has been completed let's continue with two scenarios.
- Invoice received and paid via AMEX credit card already. Enter invoice into system as a Purchase Invoice and make sure to select AMEX as the Payment Method.
- Invoice received and will be paid via AMEX credit card at a later date. Enter invoice into system as a Purchase Invoice and leave the Payment Method blank.Posting Preview shows the G/L entry as follows and will show the invoice as outstanding in the subledger.Let's now pay this invoice at a later date. When adding the vendor payment to the payment journal update the balance account type to G/L account and use account 20108 as the balance account number. You won't need to add a bank payment type in this example because we are recording this entry as a credit card payment at this time.
AMEX monthly statement is received and entered into Business Central
Now that the AMEX monthly statement is received, I'll show you how to reconcile against the liability account.
- Open the Chart of Accounts page and search for account 20108.
- Click on the balance amount to open the general ledger entries window.
- Select Review Entries on the action bar.
- The next step is to review the transactions on the AMEX statement against the entries showing in the Review G/L Entries window. I'm showing two transactions for Ingram for $840 each, which shows on my credit card statement. I highlight them on the statement to show that they've already been entered into the system. Once you complete the review it's time to enter the AMEX statement into the system.
- I enter the statement into the system through a Purchase Invoice. The important thing is that the transactions that have already hit G/L account 20108 you would enter as a G/L Account transaction to that account. That will create the debit we need to offset the payment (credit) we entered earlier with the payment method and payment journal.
If you have other charges on the statement that haven't been entered into the system, yet you can add those to the purchase invoice as well. Example of this is lines 3 and 4 below for office supplies and meals expense.
TIP: export your statement transactions to Excel and then copy/paste them into the system to streamline the process. To learn about copy/paste check this blog out: Copy/Paste A Journal Entry Into Dynamics 365 Business Central (kristenhosman.com) - The vendor invoice is paid through the payment journal as normal.
Review G/L Entries
Now that the purchase invoice is completed for the monthly AMEX statement lets open the Review G/L Entries window back up. While navigating to this window you see the G/L balance is $0, which is what is expected at this time.
Now it's time to set G/L entries as reviewed. To do this select the two transactions that go together (debit and credit) and then click on Set selected as reviewed on the action bar. Continue this process for all transactions that have hit and cleared the account.
What you're left with in the account are transactions that were not on the credit card statement. You can expect those to be on the next month's statement and will then clear. For example, I just added an invoice to Ingram that was paid via credit card for $60.99. You can see the Review By and Reviewed Date is blank in this case. That invoice should show on next months statement.


Comments